文章标题 原创 翻译 转载 文章内容 在过去的几年,我经手过很多大大小小的React项目,在这个过程中,我不断的重复重复,逐渐的形成了一些模式,在这里分享给大家。 如果你是刚开始接触React,能看到这篇文章,只能说你很幸运 :)。 如果你没有接触过React,你可以跳过(3,6,8,10)节。 # 1.数据向下和向上传递 对于刚接触React新手,我通常都会告诉他们数据的传递模式,也就是父组件向子组件传递数据(比如一个对象,一个字符串等等),也可以是一个方法,使得父组件可以得到子组件的数据。 就像把一包薯片和一个对讲机传递到被困井下的矿工手上。 下图是最简单的模式 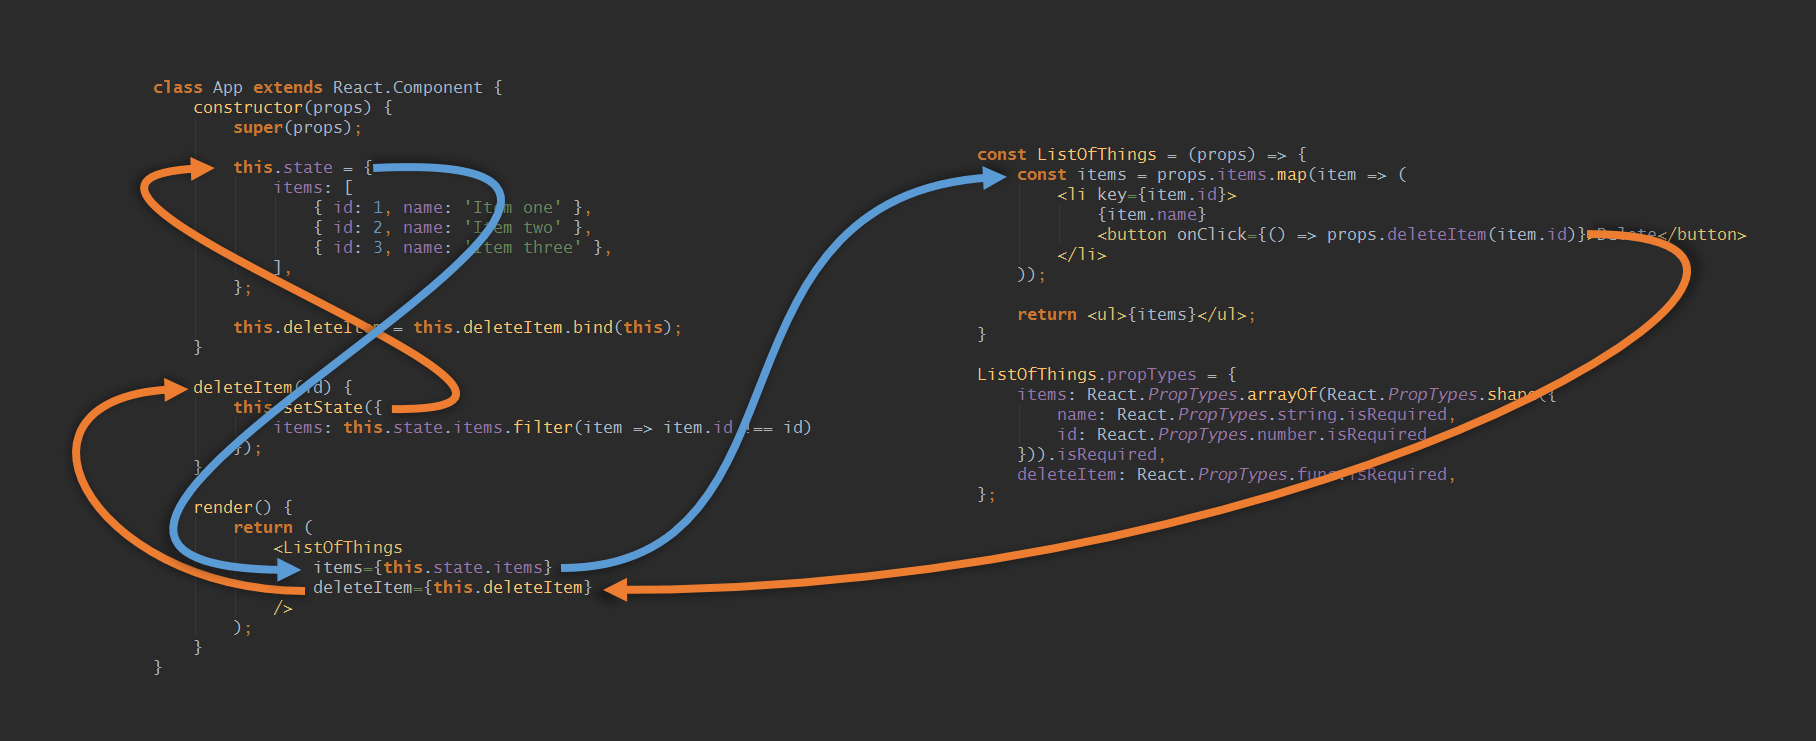 (此图胜过千言万语) 父组件在左边,子组件在右边。连接两个组件的props允许信息在两个方向任意流动。 一个 props 是items,传递信息到子组件。 一个 props 是deleteitem,给子组件一个方法来告诉父组件(“ 删除这个item ”)。 # 2.修复HTML的input标签 关于React组件化的一个重要方面就是,如果HTML中的标签不能按照你想要的方式工作,你可以按照你的方式定义它。 当我创建一个页面,页面有很多用户输入框,第一步先处理这些标签。 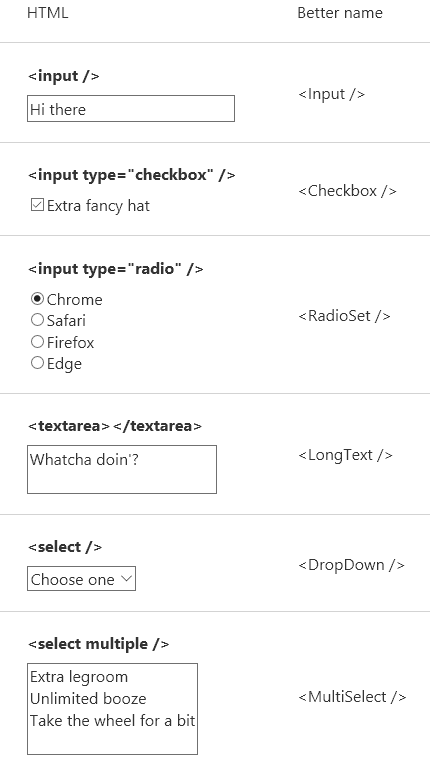 还需要注意: * 输入框应该通过onChange方法返回输入值。 * 确保输入值的类型与onChange返回值的类型相同,如果typeof props.value的类型是number,那么就需要将e.target.value的类型转换成number。 * 一组单选按钮的功能和```<Select>```一样,只是UI不同。可以在你的应用中统一成一个组件(比如<PickOneFromMany />),然后通过传递ui="radio" 或者 ui="dropDown"来区分。 # 3.为input绑定唯一的ID 我们会为input绑定唯一的ID,但是为每一个input定义一个唯一的ID很费事。 你可以为每一对input/label标签生成一个随机ID,但是客户端和服务器端渲染的HTML无法匹配 所以,你可以写一个方法自增生成ID,如下 ``` class Input extends React.Component { constructor(props) { super(props); this.id = getNextId(); this.onChange = this.onChange.bind(this); } onChange(e) { this.props.onChange(e.target.value); } render() { return ( <label htmlFor={this.id}> {this.props.label} <input id={this.id} value={this.props.value} onChange={this.onChange} /> </label> ); } } ``` 如果每次调用getNextId()时,仅仅是一个数字自增,那么在服务器端渲染,这个数字将会无限大。所以在每次网络请求的时候需要重置这个数字。代码如下: ``` let count = 1; export const resetId = () => { count = 1; } export const getNextId = () => { return `element-id-${count++}`; } ``` # 4.用props控制CSS 如果你想把不同CSS应用在不同的实例中(比如:普通按钮和高亮按钮),你可以传props来控制CSS。 表面看起来超级简单,但我保证有很多坑等你跳的。 个人觉得有三种实现的方法: * 使用主题 把许多CSS打包放到一起,然后使用属性themes来控制。比如: ``` <Button theme="secondary">Hello</Button> ``` * 设置boolean属性 比如一些特殊的按钮需要倒角,但与你定义的主题不一致。 要么你去找UI,让它设计时保持一致,要么你就设置一个值为boolean的属性来区分: ``` <Button theme="secondary" rounded>Hello</Button> ``` 类似HTML的二进制属性,所以你不需要写成```rounded = [true]```。 * 设置属性值 在某些情况下,您可能希望直接传递CSS属性的值(在组件中,将其设置为内联样式): ``` <Icon width="25" height="25" type="search" /> ``` 举个例子: 假设你正在创建一个链接组件,有三种主题,是否添加下划线是可选的。 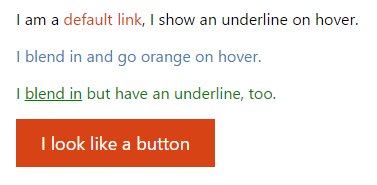 代码如下: ``` const Link = (props) => { let className = `link link--${props.theme}-theme`; if (!props.underline) className += ' link--no-underline'; return <a href={props.href} className={className}>{props.children}</a>; }; Link.propTypes = { theme: PropTypes.oneOf([ 'default', // primary color, no underline 'blend', // inherit surrounding styles 'primary-button', // primary color, solid block ]), underline: PropTypes.bool, href: PropTypes.string.isRequired, children: PropTypes.oneOfType([ PropTypes.element, PropTypes.array, PropTypes.string, ]).isRequired, }; Link.defaultProps = { theme: 'default', underline: false, }; ``` CSS: ``` .link--default-theme, .link--blend-theme:hover { color: #D84315; } .link--blend-theme { color: inherit; } .link--default-theme:hover, .link--blend-theme:hover { text-decoration: underline; } .link--primary-button-theme { display: inline-block; padding: 12px 25px; font-size: 18px; background: #D84315; color: white; } .link--no-underline { text-decoration: none; } ``` # 5.动态组件 动态组件可以渲染任何一个组件。 它可以是一个动态的页面组件,来展示一堆页面中的某一个页面,比如: ``` import HomePage from './HomePage.jsx'; import AboutPage from './AboutPage.jsx'; import UserPage from './UserPage.jsx'; import FourOhFourPage from './FourOhFourPage.jsx'; const PAGES = { home: HomePage, about: AboutPage, user: UserPage, }; const Page = (props) => { const Handler = PAGES[props.page] || FourOhFourPage; return <Handler {...props} /> }; Page.propTypes = { page: PropTypes.oneOf(Object.keys(PAGES)).isRequired, }; ``` 如果你把home,about 和 user 换成/,/about 和 /user,恭喜你,你已经把它变成了半个路由器了。 # 6.优化组件 当打开一个页面,input输入框自动获取光标,这会大大提升用户体验。 比如打开一个注册页面,光标自动获取到用户名输入栏。 有人在写这个组件的时候会想到,为input绑定一个id,然后通过```document.getElementById('user-name-input').focus()```来实现。 但我认为这并不是一个很好的方式,我有一个更好的实现方式: ``` class Input extends Component { focus() { this.el.focus(); } render() { return ( <input ref={el=> { this.el = el; }} /> ); } } ``` ok,一个拥有focus()方法的Input组件完成了。 在父亲组件中,我们可以调到子组件的focus() 方法: ``` class SignInModal extends Component { componentDidMount() { this.InputComponent.focus(); } render() { return ( <div> <label>User name: </label> <Input ref={comp => { this.InputComponent = comp; }} /> </div> ) } } ``` 注意,当您在一个组件上使用ref时,它是对组件(而不是底层元素)的引用,因此您可以访问它的方法。 # 7.别过早组件化 一个搜索组件,当你输入的时候,可以看到模糊查询到的列表,如下:  当设计这个组件的时候,你可能会想:是否需要新建一个搜索结果组件searchResult来展示搜索结果,这个组件可能只需要几行HTML和CSS代码……但我曾告诫自己,当自己犹豫是否要新建的时候,就别新建。 这种情况我不会新建一个独立的组件,而是添加一个renderSearchResult方法,返回相应的DOM。如下: ``` const SearchSuggestions = (props) => { // renderSearchSuggestion() behaves as a pseduo SearchSuggestion component // keep it self contained and it should be easy to extract later if needed const renderSearchSuggestion = listItem => ( <li key={listItem.id}>{listItem.name} {listItem.id}</li> ); return ( <ul> {props.listItems.map(renderSearchSuggestion)} </ul> ); } ``` 如果其他组件也有类似的需求,你应该复制粘贴代码到那个组件,而不是过早的组件化。 # 8.用于文本格式化的组件 这是一个Price组件,将数字处理成含或者不含小数点或者$符号的字符串。 ``` const Price = (props) => { const price = props.children.toLocaleString('en', { style: props.showSymbol ? 'currency' : undefined, currency: props.showSymbol ? 'USD' : undefined, maximumFractionDigits: props.showDecimals ? 2 : 0, }); return <span className={props.className}>{price}</span> }; Price.propTypes = { className: React.PropTypes.string, children: React.PropTypes.number, showDecimals: React.PropTypes.bool, showSymbol: React.PropTypes.bool, }; Price.defaultProps = { children: 0, showDecimals: true, showSymbol: true, }; const Page = () => { const lambPrice = 1234.567; const jetPrice = 999999.99; const bootPrice = 34.567; return ( <div> <p>One lamb is <Price className="expensive">{lambPrice}</Price></p> <p>One jet is <Price showDecimals={false}>{jetPrice}</Price></p> <p>Those gumboots will set ya back <Price showDecimals={false} showSymbol={false}>{bootPrice}</Price> bucks.</p> </div> ); }; ``` 正如你所看到的,我用使用了一个强大的字符串格式化库,[链接在这里](https://developer.mozilla.org/en-US/docs/Web/JavaScript/Reference/Global_Objects/Number/toLocaleString)。 用更少的代码实现(我不是很喜欢): ``` function numberToPrice(num, options = {}) { const showSymbol = options.showSymbol !== false; const showDecimals = options.showDecimals !== false; return num.toLocaleString('en', { style: showSymbol ? 'currency' : undefined, currency: showSymbol ? 'USD' : undefined, maximumFractionDigits: showDecimals ? 2 : 0, }); } const Page = () => { const lambPrice = 1234.567; const jetPrice = 999999.99; const bootPrice = 34.567; return ( <div> <p>One lamb is <span className="expensive">{numberToPrice(lambPrice)}</span></p> <p>One jet is {numberToPrice(jetPrice, { showDecimals: false })}</p> <p>Those gumboots will set ya back {numberToPrice(bootPrice, { showDecimals: false, showSymbol: false })} bucks.</p> </div> ); }; ``` 注意:我并没有检查传入数字的的有效性,是因为…………lan。 # 9.降低组件复杂度 我可能写过上千次这种判断: ``` if (props.user.signInStatus === SIGN_IN_STATUSES.SIGNED_IN)... ``` 这是一个错误示范,我应该判断“用户是否登录”而不是判断“用户登录状态===登录” 我的组件已经够复杂了,不应该让它去考虑传入的价格是不是数字,亦或者boolean值是否是‘true’。 正如你所见,如果你的数据store和你的组件是相匹配的,那么你的组件将会简单得多。我以前就说过,“复杂”是bug的藏身之处。组件越简单,出bug的概率就越小。 但是“复杂”无法避免,如何处理呢? 我建议创建一个模块,来专门处理输入数据,比如重命名props,字符串转成数字,对象转成数组,数据字符串转成数据对象,等等。 全部在一个地方处理和测试。 如果你设置react/redux,你应该这样在action中写请求搜索结果: ``` fetch(`/api/search?${queryParams}`) .then(response => response.json()) .then(normalizeSearchResultsApiData) // 处理所有数据 .then(normalData => { // 得到处理后的数据 }); ``` 这样会大大降低组件的复杂度。 # 10.不用相对路径来导入组件 别这样写: ``` **import** Button **from** '../../../../Button/Button.jsx'; **import** Icon **from** '../../../../Icon/Icon.jsx'; **import** Footer **from** '../../Footer/Footer.jsx'; ``` 要这样写: ``` import {Button, Icon, Footer} from 'Components'; ``` 理论上你可以这样实现: * 创建一个index.js做索引,让你所有的组件可以被引用。 * 使用Webpack的 resolve.alias 来重定向组件的索引文件 我按照以上理论实现的时候发现这样做并不好,有三个原因: * Webpack 2删除了alias方法 * eslint会报错,因为组件并没有在node_modules中。 * 如果你用WebStorm,cmd/ctrl + 左键组件名的时候,会自动打开该组件文件。但是这个功能将会失效。 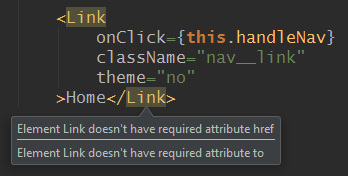 ( 编辑: matthew hsiung 找到了eslint 和 [WebStorm的解决方案](https://medium.com/@hsiungmatt/great-article-917a2f6b718e#.w66jk94ao)。) 最后 写了很多,希望对您有帮助! 转载,[原文链接](http://www.zcfy.cc/article/10-react-mini-patterns-hacker-noon-3912.html?hmsr=toutiao.io&utm_medium=toutiao.io&utm_source=toutiao.io) 文章类别 Python Mobile Android Java Shell Life Database Bug Windows IOS Tools Boost Node.js Mac Product Tips C/C++ Golang Javascript React Qt MQ MongoDB Design Web Linux LLM ChatGPT RAG AI 提交
